State Machine Style (Conceptual - XState)
Summary
✅ Updated Section for Solution 4
What is a State Machine?
A state machine is a mathematical model of computation that defines the behavior of a system through a finite number of states, transitions between those states, and actions triggered by events or conditions.
It is particularly useful for modeling complex decision flows, workflows, and processes with clear rules.
Why does it fit perfectly with this access control approach?
The wristband access flowchart is a classic decision tree with clear stages, conditions, and outcomes. A state machine maps almost 1:1 to the flowchart:
- Each box in the flowchart becomes a state.
- Each decision becomes a guard condition or transition.
- The final result (granted/denied) becomes final states.
- It makes the logic visual, predictable, auditable, and easy to extend (adding new steps, retries, timeouts, etc.).
This approach shines when the logic grows in complexity.
Visual Diagram (XState)
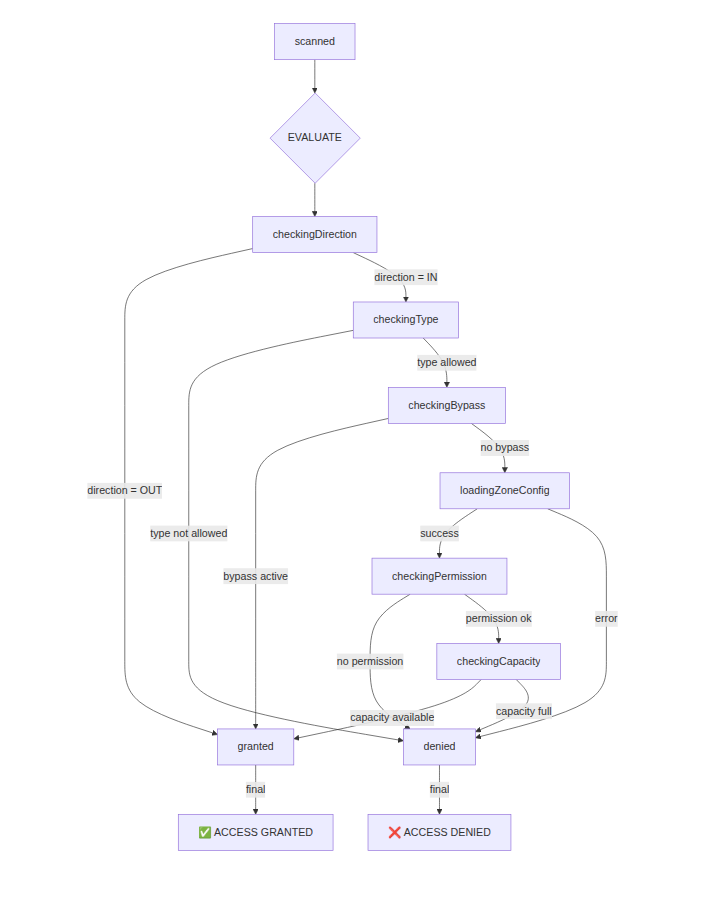
Full JavaScript Implementation with XState
Understanding the State Machine Code
Imagine a state machine like a smart traffic light system for your access control logic. Instead of writing messy if/else statements, we create a clear map of stages (states) that the wristband scan goes through, one step at a time.
At the beginning, we are in the scanned state. When we call evaluateWristbandAccess(), the machine starts moving:
- It first checks the direction (IN or OUT).
- If it’s OUT → it goes straight to
granted. - If it’s IN → it moves to
checkingType, thencheckingBypass, and so on.
Each state has clear rules (called guards) that decide where to go next. For example:
- “Is the wristband type allowed?”
- “Is there an active bypass?”
- “Is the zone capacity full?”
When the machine reaches either granted or denied, it stops.
These are final states.
The best part? The code reads almost like the original flowchart! This makes it much easier to understand, test, and update later. Even if you add new rules (like time-based access or VIP checks), you just add new states instead of breaking existing code.
This approach turns complicated decision logic into a clean, visual, and professional system.
// approach-4-state-machine.js
import { createMachine, interpret } from 'xstate';

const accessMachine = createMachine({
  id: 'wristbandAccess',
  initial: 'scanned',
  context: {
    wristband: null,
    checkpoint: null,
    config: null,
    result: null
  },
  states: {
    scanned: {
      on: {
        EVALUATE: {
          target: 'checkingDirection',
          actions: 'assignData'
        }
      }
    },

    checkingDirection: {
      always: [
        { target: 'granted', cond: 'isExit' },
        { target: 'checkingType' }
      ]
    },

    checkingType: {
      always: [
        { target: 'denied', cond: 'isTypeNotAllowed', actions: 'setTypeDeniedResult' },
        { target: 'checkingBypass' }
      ]
    },

    checkingBypass: {
      always: [
        { target: 'granted', cond: 'hasActiveBypass', actions: 'setBypassGrantedResult' },
        { target: 'loadingZoneConfig' }
      ]
    },

    loadingZoneConfig: {
      invoke: {
        src: 'fetchZoneConfig',
        onDone: { target: 'checkingPermission', actions: 'assignConfig' },
        onError: { target: 'denied', actions: 'setConfigErrorResult' }
      }
    },

    checkingPermission: {
      always: [
        { target: 'denied', cond: 'noEnterPermission', actions: 'setNoPermissionResult' },
        { target: 'checkingCapacity' }
      ]
    },

    checkingCapacity: {
      always: [
        { target: 'granted', cond: 'hasCapacity', actions: 'setCapacityGrantedResult' },
        { target: 'denied', actions: 'setCapacityFullResult' }
      ]
    },

    granted: { type: 'final' },
    denied: { type: 'final' }
  }
}, {
  guards: {
    isExit: (ctx) => ctx.checkpoint.direction === 'OUT',
    isTypeNotAllowed: (ctx) => !ctx.checkpoint.allowedTypes.includes(ctx.wristband.type),
    hasActiveBypass: (ctx) => ctx.wristband.bypassUntil && new Date(ctx.wristband.bypassUntil) > new Date(),
    noEnterPermission: (ctx) => !ctx.config?.enterPermission,
    hasCapacity: (ctx) => ctx.config && ctx.config.currentCount < ctx.config.maxCapacity,
  },
  actions: {
    assignData: assign((_, event) => ({
      wristband: event.wristband,
      checkpoint: event.checkpoint
    })),
    assignConfig: assign({ config: (_, event) => event.data }),
    setTypeDeniedResult: assign({ result: (ctx) => ({
      code: 'TYPE_NOT_ALLOWED',
      message: `Type ${ctx.wristband.type} not allowed`
    })}),
    setBypassGrantedResult: assign({ result: { message: 'Bypass active' } }),
    setNoPermissionResult: assign({ result: { code: 'NO_PERMISSION', message: 'No permission' }}),
    setCapacityFullResult: assign({ result: (ctx) => ({
      code: 'CAPACITY_FULL',
      message: `Capacity full (${ctx.config.currentCount}/${ctx.config.maxCapacity})`
    })}),
    setConfigErrorResult: assign({ result: { code: 'ZONE_CONFIG_MISSING', message: 'Configuration error' }})
  },
  services: {
    fetchZoneConfig: async (ctx) => await getZoneConfig(ctx.checkpoint.zoneId)
  }
});

// Usage
async function evaluateWristbandAccess(wristband, checkpoint) {
  return new Promise(resolve => {
    const service = interpret(accessMachine)
      .onDone(state => resolve({
        granted: state.value === 'granted',
        code: state.context.result?.code || 'GRANTED',
        message: state.context.result?.message || 'Access granted'
      }))
      .start();

    service.send({ type: 'EVALUATE', wristband, checkpoint });
  });
}
Best for: Very complex flows with many side effects, retries, or when you need visual debugging of the flow.